This week I was given a bag of Rowan Siena, in 8 different colours. I fancied making a summery top with it, and had been thinking about Marie Wallin’s ‘Eldora’, which we published in The Knitter a couple of months ago. I sat at lunchtime, deciding which yarn should replace which in the pattern, given that my choices for the ribbing were either blue, green, red or grey.
I got home and decided the easiest way for me to visualise what it would look like would be to recolour the original picture, and I thought a little tutorial for those of you unfamiliar with the process might be a nice gesture.
This is a quick fix, it’s by no means great photoshop work, but it will give you an idea of
what different colourways might look like, if you are intending to recolour a pattern using oddments of your stash.
1) Firstly, scan the photo of the pattern you wish to re-colour.
2)If your adjustment palette isn’t already showing, you’ll need to make this visible. Find this under the Window menu.
3) Next, you want to switch on Quick Mask mode. This allows you to quickly select the area you want to change. Double click the little button at the bottom of the tools palette and check the colour indicates selected areas. Press ok.
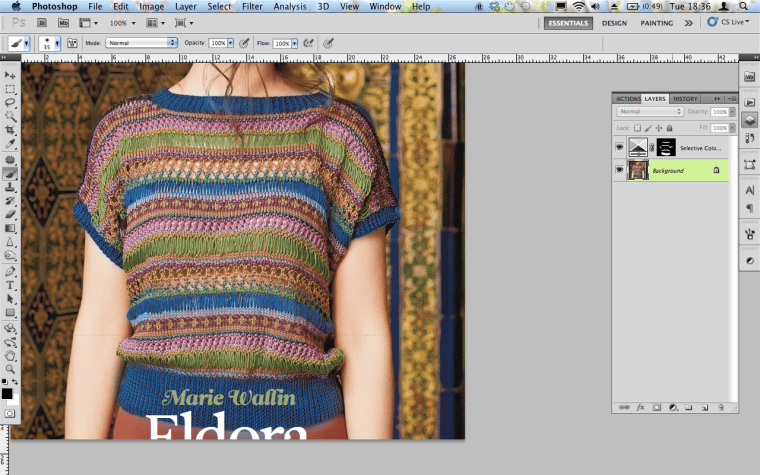
4) Now select the paintbrush tool from the tools palette and make sure that the foreground colour is set to black. Carefully paint over all the areas that you want to change. Here I have painted over all of the Blackberry shade, as I want to see what it looks like in blue.
5) Next press the Quick Mask button or hit ‘Q’ to take you out of Quick Mask mode. The stripes or area you have selected will now have a dashed line dancing around it.
6) Next go to the adjustments palette you brought up at the beginning and select the Selective Colour Adjustment Layer.
7) This will bring up a bunch of sliders to play with based on the colours in the selection you are changing. Here I started with the magenta selection, and then changed to neutral, before I got a blue similar to that in my stash of Siena.
Now you should have something that looks a bit like a dodgy photoshop job, but an idea of what the new colour might look like.
Next you want to open the Layers palette (see above) and make sure you are selected on the Background layer. This is an important step!
Go back to Quick Mask mode again, by using the button or pressing ‘Q’, and select the next stripe or area you want to change. Repeat from step 4 as many times as necessary until you have covered all the colours. Don’t worry if you aren’t totally happy with the shades as we are going to go back and edit some of them in a minute.
I ended up with the above colours, which I was sort of happy with, but wanted to see what other options I had. If you go back to your Layers palette again, you can select all of the changes you made separately and play with them until you are happy. You might also find it useful to label your colours (I changed them with every change I made to the shade, so I could easily find which was which.) Double click the name to change it, or the Selective Colour icon to play with the sliders again.
If you save your file as a psd you’ll be able to go back and edit the colours afterwards, or if you’re totally happy then you can go to Layer/Flatten and save it as a jpeg or tiff.
And there you have it! The yellow is a bit more acidic than the one in my stash but it has given me a better idea of which colours I could use in the larger stripes.
Play around and see what you end up with!


